React and ES6 - Part 2, React Classes and ES7 Property Initializers
This is the second post of series in which we are going to explore the usage of React with ECMAScript6.
You could find links to all parts of series below:
- React and ES6 - Part 1, Introduction into ES6 and React
- React and ES6 - React and ES6 - Part 2, React Classes and ES7 Property Initializers
- React and ES6 - Part 3, Binding to methods of React class (ES7 included)
- React and ES6 - Part 4, React Mixins when using ES6 and React
- React and ES6 - Part 5, React and ES6 Workflow with JSPM
- React and ES6 - Part 6, React and ES6 Workflow with Webpack
The code corresponding to this article is available on the GitHub.
Update from 14.06.2016: Updated the code and text to use React 15 and Babel 6.


In the first article, we started with an introduction into ES6 and creating static React component outputting “Hello from ES6”. Not so exciting :)
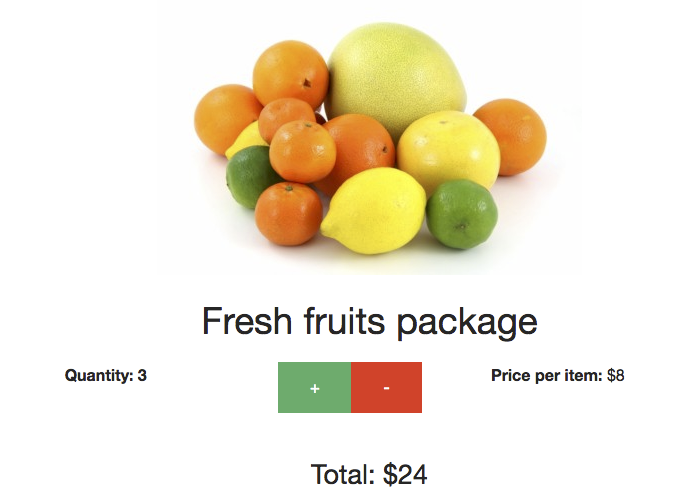
In this article, we are going to create a bit more sophisticated React component named CartItem.
It will output information about some product in the cart including image, title and price.
Additionally, a user could interact with CartItem component by increasing or decreasing a number of items.
Our component will respond to this interaction by changing a total price.
This is what we’ll see in the end:
Creation of index.html file
Let’s start with the creation of simple HTML file that will be our HTML template file.
<!DOCTYPE html>
<html>
<head lang="en">
    <meta charset="UTF-8">
    <title>React and ES6 Part 2</title>
    <link rel="stylesheet" href="https://cdnjs.cloudflare.com/ajax/libs/foundation/5.5.2/css/foundation.min.css">
</head>
<body>
<div class="root"></div>
<script src="dist/bundle.js"></script>
</body>
</html>
Notice we’ve added Foundation CSS framework served via CDN. It was done just for the prettier look of our micro application.
Also div.root will be the place where we will mount React application.
Gulpfile.js
Just copy and paste gulpfile.js from the previous part of series. No changes to it by now.
Same copy & pasting for package.json.
Next, run npm install (to install node dependencies) and then gulp. Gulp will continuously watch for your changes.
Main application React Component
Create app.jsx:
1
2
3
4
5
6
7
8
9
10
11
12
13
14
15
16
17
18
import React from 'react';
import ReactDOM from 'react-dom';
import CartItem from './cartItem';

const order = {
    title: 'Fresh fruits package',
    image: 'http://images.all-free-download.com/images/graphiclarge/citrus_fruit_184416.jpg',
    initialQty: 3,
    price: 8
};

ReactDOM.render(
    <CartItem title={order.title}
              image={order.image}
              initialQty={order.initialQty}
              price={order.price}/>,
    document.querySelector('.root')
);
What’s going on here:
- Lines 1-2. We import React / ReactDOM libraries.
- Line 3. Import
CartItemReact component that we’ll create later. - Lines 5-10. Sending props to
CartItemcomponent (props include item title, image, initial quantity and price). - Lines 12-18. Mounting
CartItemcomponent to DOM element specified by its CSS class.root.
CartItem React Component skeleton
Now it’s time to create component responsible for displaying item’s data and also for interaction with a user.
Add this code to file named cartItem.jsx:
1
2
3
4
5
6
7
8
9
10
11
12
13
14
15
16
17
18
19
20
21
22
23
24
import React from 'react';

export default class CartItem extends React.Component {
    constructor(props) {
        super(props);
        this.state = {
            qty: props.initialQty,
            total: 0
        };
    }
    componentWillMount() {
        this.recalculateTotal();
    }
    increaseQty() {
        this.setState({qty: this.state.qty + 1}, this.recalculateTotal);
    }
    decreaseQty() {
        let newQty = this.state.qty > 0 ? this.state.qty - 1 : 0;
        this.setState({qty: newQty}, this.recalculateTotal);
    }
    recalculateTotal() {
        this.setState({total: this.state.qty * this.props.price});
    }
}
Explanation:
- Lines 4-10. This is the constructor of newly added React class. The first thing to note here is call to
super(props)which is required. Another thing - instead of using ReactgetInitialState()lifecycle method, React team recommends to use instance property calledthis.state. We initialize our state with props sent fromapp.jsxfile. Personally, I like this improvement. - Lines 11-13. Declaration of
componentWillMount()lifecycle method (which is eventually justCartItemclass method). Inside this method, we do a recalculation of the total price. To calculate total price we userecalculateTotal()which multiplies quantity (which is state of our component) by price (which is props). - Lines 14-20. These are methods for increasing or decreasing the amount of items by a user.
These methods will be called when user clicks corresponding buttons in the view (refer to the screenshot of the application at the beginning of post).
Also notice that we are using second callback parameter of
this.setState()method to recalculate the total price.
CartItem render method
Add this new method inside CartItem class:
export default class CartItem extends React.Component {

    // previous code we wrote here

    render() {
        return <article className="row large-4">
            <figure className="text-center">
                <p>
                    <img src={this.props.image}/>
                </p>
                <figcaption>
                    <h2>{this.props.title}</h2>
                </figcaption>
            </figure>
            <p className="large-4 column"><strong>Quantity: {this.state.qty}</strong></p>

            <p className="large-4 column">
                <button onClick={this.increaseQty.bind(this)} className="button success">+</button>
                <button onClick={this.decreaseQty.bind(this)} className="button alert">-</button>
            </p>

            <p className="large-4 column"><strong>Price per item:</strong> ${this.props.price}</p>

            <h3 className="large-12 column text-center">
                Total: ${this.state.total}
            </h3>

        </article>;
    }
}
Here we just output tags using JSX + component state and apply some Foundation CSS beauty.
Don’t worry about {this.increaseQty.bind(this)} - I am going to cover this in the next part of series.
For now just believe me that this line will call increaseQty() method of CartItem class.
So, now we have pretty simple application interacting with a user. Even this example is simple, it showed us how to write React components using ECMAScript6. Personally I like the new syntax that ES6 brings to us.
We are not done yet. Before finishing the article, I would like to take a look at a couple of additional ES6 features.
Default Props and Prop Types for ES6 React classes
Imagine we want to add some validation and default values for CartItem component.
Luckily, this is built-in into React and called Default Props and Prop Types. You could familiarize yourself with both of them here.
Right after CartItem class add these lines:
1
2
3
4
5
6
7
8
9
10
CartItem.propTypes = {
    title: React.PropTypes.string.isRequired,
    price: React.PropTypes.number.isRequired,
    initialQty: React.PropTypes.number
};
CartItem.defaultProps = {
    title: 'Undefined Product',
    price: 100,
    initialQty: 0
};
As a result, if you now send numeric title prop inside app.jsx you’ll have a warning in console.
This is the power of React props validation.
Bringing ES7 into the project
You could ask a very reasonable question - why do you have ES7 in heading above if even ES6 is not yet finalized?
I will answer that let’s look into the future. And start using non-breaking features like property initializers or decorators.
Even if ES7 is still in the very early stage, there is number of proposed features that are already implemented in Babel. And these experimental features are transpiled to valid ES5 code from ES7. Awesome!
First, install the missing npm module by running npm install --save-dev babel-preset-stage-0.
Next, in order to bring that additional syntax sugar to our project, we’ll need to make the very small change on line 8 of gulpfile.js.
Substitute this line with the code below:
.transform('babelify', {presets: ['react', 'es2015', 'stage-0']})You could grab final gulpfile.js from GitHub repository
ES7 Property Initialiazers for Default Props and Prop Types of React component
Inside CartItem class add this right above constructor:
export default class CartItem extends React.Component {
    static propTypes = {
        title: React.PropTypes.string.isRequired,
        price: React.PropTypes.number.isRequired,
        initialQty: React.PropTypes.number
    };
    static defaultProps = {
        title: 'Undefined Product',
        price: 100,
        initialQty: 0
    };

    constructor() {
        ...
    }

    // .. all other code
}
This is doing the same thing as code after the class definition, just in a bit more neatly way (in my opinion).
You could also delete code related to propTypes / defaultProps that goes after CartItem class definition as it is not needed anymore.
ES7 Property Initialiazers for initial state of React component
The finishing step will be transferring initial state from the constructor to property initializer.
Add this right before constructor of CartItem class:
export default class CartItem extends React.Component {
    // .. some code here
    state = {
        qty: this.props.initialQty,
        total: 0
    };
    // .. constructor starts here
You could also delete code related to initializing of state from the constructor.
Done. You could check out final cartItem.jsx for this part on the series on the
GitHub.
Conclusion
In this part, we familiarized ourselves with writing React components using ES6 classes and introduced ES7 property initializers.
Stay tuned for the next parts of React + ES6 series!